How to Use the Chip Reader for Square
Set Up the Square Reader for Contactless and Chip
Before setting up your Square Reader for contactless and chip, make sure you have a compatible device with the latest version of the Square app.
For a full overview on setting up your reader, you can watch this video or keep reading below:
1. Check the Battery of Your Square Reader
For an accurate battery reading, unplug your reader from any power source.
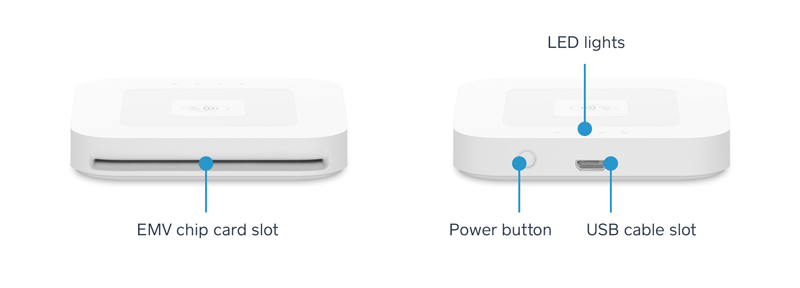
Firmly press the button on the reader. Green lights indicate that you're charged and ready to go. If you see a single red light, charge up immediately. Once your reader is on, you don't need to worry about turning it off. It'll automatically go into sleep mode after 2 hours of inactivity. To wake it up from sleep mode, firmly press the button on the side of the reader once.
2. Charge Your Square Reader
Connect one end of the accompanying USB cable to your reader and the other end to a USB port like a cell phone charger, computer, or car charger.
It will take around 2 hours for a reader with a low battery to charge completely.
Note: You can also use the Dock for Square Reader to keep your reader charged and in place while you take payments.
3. Wirelessly Connect Your Square Reader
The new reader connects wirelessly with Bluetooth Low Energy (Bluetooth LE). Be sure you have the latest version of the Square app for your device. Note: For optimal performance, please ensure your device is running the latest version of its operating system and the Square app.
Watch this video to learn how to wirelessly connect your reader:
To connect your reader:
-
Go to your device settings and make sure Bluetooth is turned on.
-
Open the Square app and tap More from the navigation bar at the bottom of your screen.
-
Tap Settings > Hardware > Card Readers > "Connect a Reader."
-
Put your reader into pairing mode by pressing the reader's button for 3-10 seconds.
-
Remove your finger as soon as you see orange flashing lights. If you see red flashing lights, you've held the button too long and you'll need to try again.
When connected, the reader will be listed as Reader Ready in-app.
Any necessary firmware updates will be automatically installed once the reader has been connected.
Now that you're set up, learn more about accepting chip card and contactless payments.
Note: The wireless connection can be lost if the reader and device are more than 10ft apart.
If your reader was previously paired to a different device: Keep in mind, if you are reconnecting a reader that was previously paired to a different device, you may need to forget your reader from the device it was previously paired with. For more information on reconnecting a reader, check out our troubleshooting article.
What do the lights mean?
Connecting your reader
Accepting a payment
Checking your battery
Square Stand and the Square Reader for Contactless and Chip
If you're using a Square Stand with the reader, set up is simple. Just plug the included USB cable (or optional Dock for Square Reader) to the USB hardware hub on the Square Stand.
You can also connect your reader wirelessly if there are no free USB ports on your stand's hardware hub.
Note: The iPad 2 doesn't wirelessly connect with the reader and requires a Square Stand to connect via USB.
Watch this video to learn how to connect the Square Stand and reader:
Find answers to frequently asked questions and review these reader troubleshooting tips if you run into any issues.
How to Use the Chip Reader for Square
Source: https://squareup.com/help/us/en/article/5639-set-up-the-square-reader-for-contactless-and-chip